


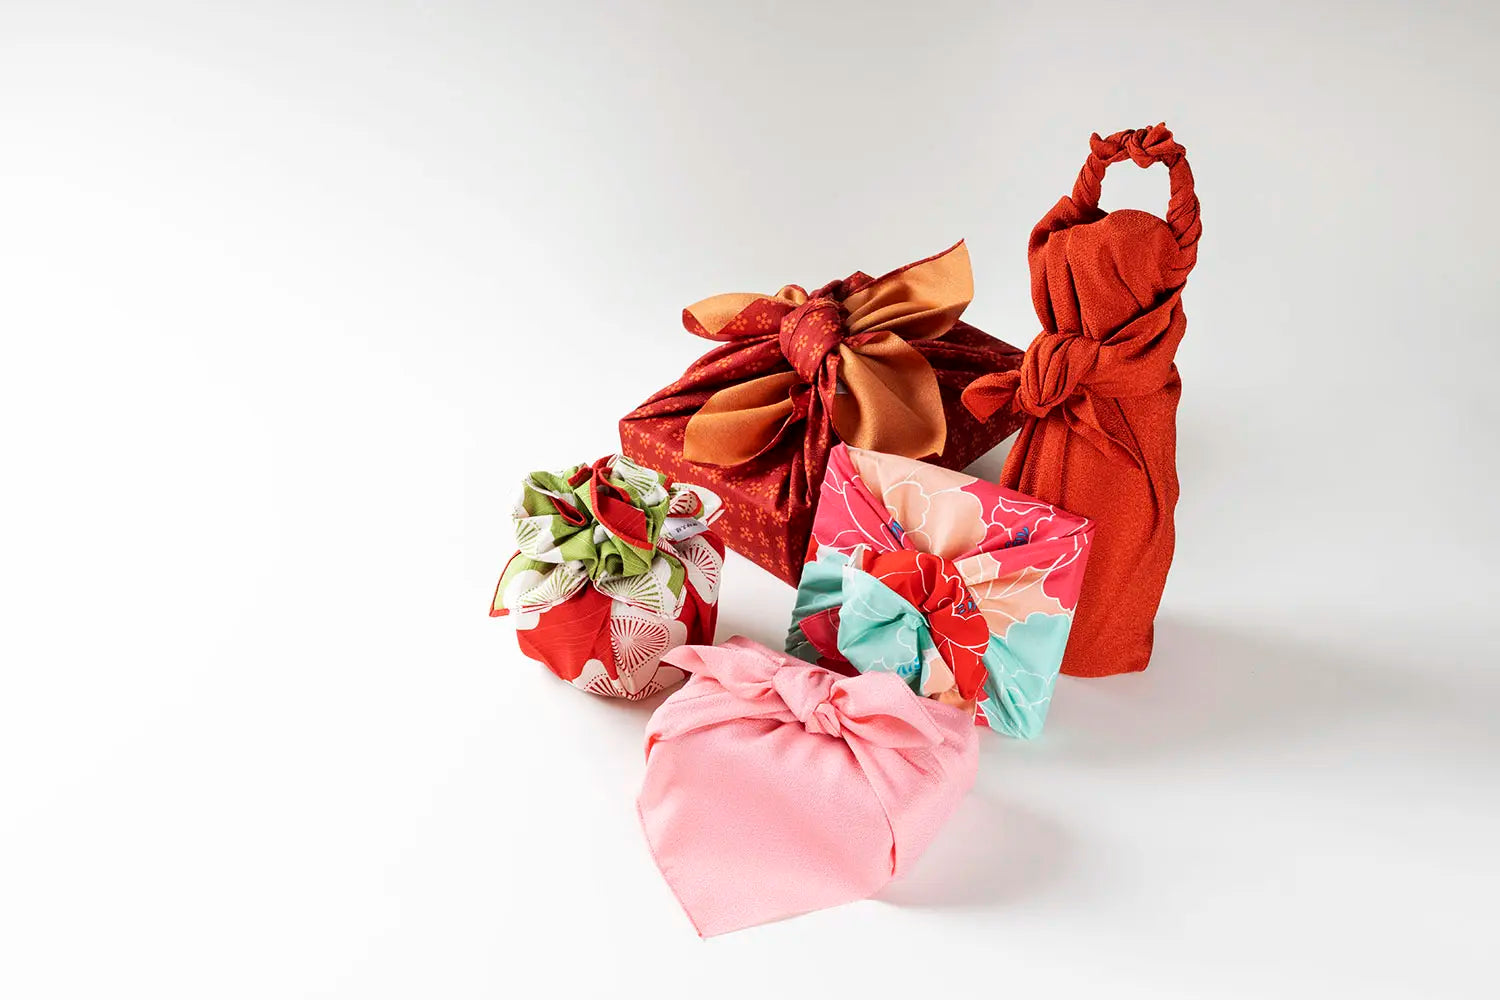
The products we used:
Furoshiki: Traditional Cloth, Modern Hobby
Furoshiki are traditional Japanese cloths with a variety of uses. While historically they were folded and tied in special ways for everyday purposes, modern Japanese typically only learn to use them as a hobby. If you're interested in dipping your toes into the waters of Japanese tradition, furoshiki is an easy and fun way to do it.
In this article, I'll introduce three different ways of using furoshiki to wrap gifts. Using furoshiki--like the MUSUBI series of furoshiki from Yamada Sen-I--as gift wrap is an easy way to get started with a fun hobby, and a nice way to share your hobby and Japanese culture with the people you love. Plus, once they unwrap their gift, they can use the furoshiki as a placemat for flower vases or photo frames.
First, let's start with an easy wrapping style: Otsukai-tsutsumi.
Otsukai-tsutsumi
- Prepare the Furoshiki and Item

Lay the furoshiki flat, with the design side facing down. Put the item you want to wrap in the center of the furoshiki.
2. Fold and BundlePrepare the Furoshiki and Item


Fold one corner of the furoshiki over the item. Fold the opposite corner over the first, creating a triangle.
3. Tie the Knot


Take the two side corners of the triangle and tie them together securely above the item.
Adjust the knot so that it is snug but not too tight.
Hana-tsutsumi
The Hana-tsutsumi style is the most popular way of tying furoshiki. It's a traditional Japanese wrapping technique that resembles the shape of a flower bouquet.
- Create a triangle

Lay the furoshiki flat, with the design side facing down. Put the item you want to wrap in the center of the furoshiki. Pinch two corners of the furoshiki together above the item to make a triangle covering the item.
2. Grasp the Base of the Triangle

With one hand still pinching the top of the triangle, use your other hand to grab the top of the furoshiki triangle and then slide it down to the base of the triangle, on top of the item.
3. Wrap and Tie Other Ends


The middle portion of the furoshiki is going to become the flower. To make that possible, you are going to create a ring with the remaining two ends of the furoshiki.
While grasping the base of the middle plume of the furoshiki in a fist, anchor the item to the table with your fist. Take one of the other ends in your hand and wrap it around to the opposite side and then towards you. Use your fist to hold that wrapped end in place. Do the same thing with the other end and then tie the two ends together. Don't tie them too tightly.
4. Fold the Flower


With the middle "ring" created, take the middle "petals" of the furoshiki and fan them out to get the wrinkles out. Pull one petal up, and using your pointer finger, push the middle of the petal into the middle of the ring. Do the same to the other petal.
5. Adjust the Shape:

Hold the twisted ends of the furoshiki and adjust the shape by gently pulling and arranging the fabric to resemble the petals of a flower.
Here is are two instructional videos in Japanese from the makers of the MUSUBI series of furoshiki:
https://www.youtube.com/watch?v=rUn-0eolayQ
https://www.youtube.com/watch?v=qC9Ap-LxRQ4
Binippon-tsutsumi
The Binippon-tsutsumi style is used for wrapping bottles, typically wine bottles.
- Lay the Bottle on Top of the Furoshiki.

Lay the bottle on top of the furoshiki, making sure that the bottle's bottom is placed in the middle with the top of the bottle facing away from you.
2. Fold the Furoshiki Over the Bottle.


Fold the end closest to you over the bottle to cover it. The tip of that end should now be pointing away from you. Fold the end under the top of the bottle. Take the opposite end and fold it over the bottle. It should almost reach the bottom of the bottle.
3. Wrap, Tighten, then Twist the Ends.


Take the other two ends of your fists and then fold them tightly to their opposite ends. Next, twist them around once.
4. Wrap around and Tie


With the furoshiki twisted, stand the bottle up and spin it so the twisted portion is facing away from you. Wrap the ends around to you and tie them together.
5. Tying the Bow


This last part is tricky. Once you have the two ends tied, notice that they are perpendicular to the bottle. Now, "turn" them. In the first picture in this section, the end on the left will move to the top in the next picture. Take the right end and make an open loop by folding it to the left side. After that, wrap the top end over, under, and then through the loop. After tying, adjust the material around the bow to your liking.
You can also find an alternative form of this style of wrapping in this video. They use an elastic band (like hair bands) to tie the bow in a more elaborate way.
Bonus: Mamusubi knot
While I didn't write a guide for it in this article, our friends from Yamada Sen-I have an instructional video for teaching the mamusubi knot tying method:
General Guidelines and Other Resources
I am no expert on furoshiki. My experience with furoshiki is wrapping a tissue box using the Hana-tsutsumi method above. However, that's probably more experience than you have, so I feel I can offer a bit of advice to getting started and improving.
- When you're getting started, you might successfully complete a wrapping, but be dissatisfied with the result. That's normal. It'll take practice to get better.
- In the beginning, slow down and pay close attention to details. For example, while trying the methods above, at each step you should ask yourself: How do the wrinkles look? How should I hold this end? Am I tying or folding too tightly or loosely? Is my furoshiki too big or too small for this item?
- Like with all hobbies, once you get enough experience, you'll learn what you like and don't like. Some furoshiki hobbyists like "close fit jeans" style wraps and ties, others like a "loose fit" style.
The nice thing about learning how to use furoshiki is that you don't need to know any Japanese. Just search for furoshiki (or 風呂敷 in Japanese) on Youtube and follow along with any video, even with the audio on mute. Globalkitchen Japan also sells a small book for getting started with furoshiki that costs the same as many of the furoshiki we sell.


